How to create Code Sign Files for your iOS App
To successfully build an iOS App (for iPhone or iPad devices), you must first create the necessary 'Code Sign Files'.
In this tutorial we'll explain how to generate these files from start to finish, for incorporation into your App as part of the build request process.
Note: To create these files you must an Apple Developer Account established and have access to an Apple Mac computer.
The 'certificate signing request' (.CSR) file is generated using the 'Keychain Access' App on your Mac computer. Find and open 'Keychain Access' on your Mac.
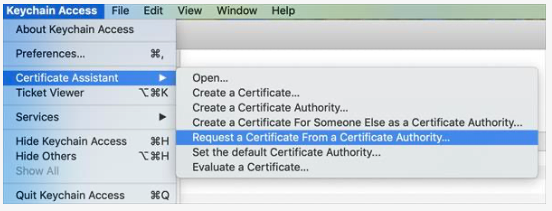
Once the Keychain App is open, click 'Keychain Access' (top left of screen), then select 'Certificate Assistant', then select 'Request a Certificate from a Certificate Authority', as shown in the image below.
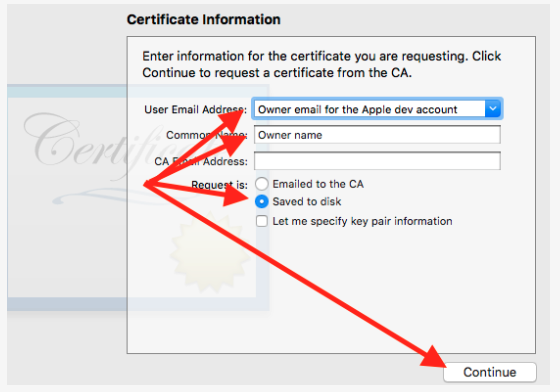
In the window which opens next (as shown below), please enter the email address which is registered / associated with your Apple Developer Account in the 'User Email Address' field.
Note: If you use a different email address, the build will fail. The email address entered must be the same as the email address on the Apple Developer Account under which the App is intended to be published.
Next, enter the first name and last name of the person registered / associated with the Apple Developer Account in the 'Common Name' field (for example, John Appleseed). Entering a different name won't result in a build failure.
Next, leave the 'CA Email Address' field blank.
Next, select the 'Saved to disk' radio button from the options available under the 'Request is' section.
Next, ensure you leave the 'Let me specifiy key paif information' check box unchecked.
Now click 'Continue'. You will be prompted to save the .csr file on your computer at a location of your choosing. Make sure you know where you saved it!
Congratulations. The .CSR file generation process is now done. The file you created will be named 'CertificateSigningRequest.certSigningRequest'. You will need to use in the next step when you create the iOS Distribution Certificate, as described below.
2. iOS Distribution Certificate
|
Open your Apple Developer Account (currently via www.developer.apple.com). Select 'Account' (at the top right of the www.developer.apple.com webpage) and enter your credentials to open the developer dashboard. Select 'Certificates, Identifiers and Profiles'.
Once you are in the 'Certificates, Identifiers and Profiles' section, you need to create a new certificate. Select 'Certificates' from the options listed down the left side of the screen, then click the blue + button to start the process (as shown below).
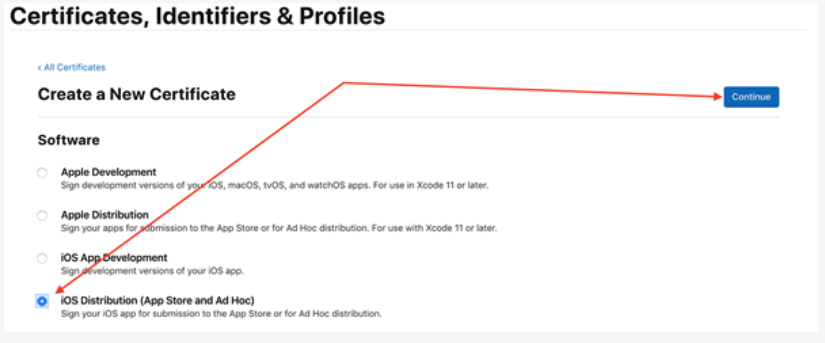
In the window which opens next, select the 'iOS Distribution (App Store and Ad Hoc)' option then click 'Continue' (as shown below).
In the window which opens next, this is where you are required to upload the .CSR file you previously created. Click on 'Choose File' and then select the .CSR file you saved locally. Remember that the file is named 'CertificateSigningRequest.certSigningRequest'. After successfully uploading the file, click 'Continue' as shown below.
Your iOS Distribution Certificate is now ready to be downloaded. Click on the 'Download' button and save it locally on your computer. Note that the name of the certificate will be 'ios_distribution.cer'. If you relocate the file from your 'Downloads' folder, make sure you know where you save the certificate.
Once the certificate has been downloaded, locate it then 'Double-Click' the file. This will add the Distribution Certificate to your Keychain. This step must be completed in order for you to export the 'p12 Private Key' as described in the next step.
Congratulations, after double-clicking the iOS Distribution Certificate file, it will be added to your Keychain ready for upload into your App as part of the build request process. More on that later......
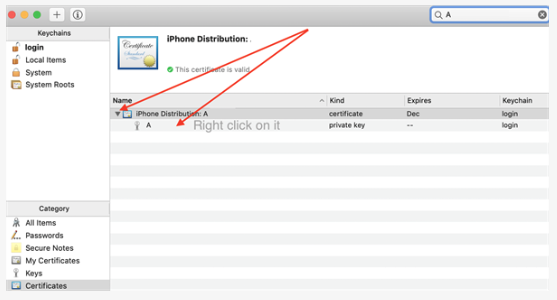
Open the Keychain App again and select the 'Certificates' category as shown below. Search for the newly created Distribution Certificate.
If you have generated multiple certificates for multiple Apps in the past, you can try to locate the correct certificate by looking at the expiry date field (the most recent certificate will expire later in time). You can also click on the grey arrow next to each certificate to reveal a 'drop down' item showing the 'Common Name' you entered when generating the .CSR file (to cross-check).
Note: Make sure you select the correct Distribution certificate, otherwise the build will fail.
Once you have correctly identified the Distribution Certificate (for example named 'iPhone Distribution: xxxxx'), click the grey arrow (as described above) to reveal the 'p12 Key' (as shown below).
Next, 'Right-click' on the the key and then click 'Export'.
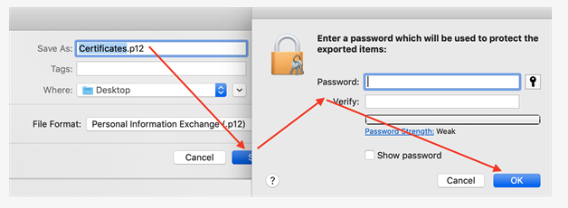
In the window that opens, click 'Save' and then enter a password (and verify the password) for the key. If your Mac asks for your Mac Password at this stage, enter it and click 'Allow' as required.
Note: You will need to enter the p12 password as part of the future build request for your App. DO NOT FORGET it, or you will not be able to successfully build your App.
Congratulations. You have now created your p12 Private Key as required.
4. Application Identifier (App ID)
|
Go back to your Apple Developer Account. In the same 'Certificates, Identifiers and Profiles' section, select the 'Identifiers' category from the list on the left, then click the blue + button as shown below.
Next, on the 'Register a New Identifier' page that opens, select App IDs, then click 'Continue' as shown below.
On the 'Register an App ID' page that opens, select 'App' (not App Clip), then click 'Continue' as shown below.
On the next page that opens, enter the name of the App (as intended to be displayed in the App Store) in the 'Description' field on the left. You can have spaces here if preferred, but no special characters.
Select the 'Explicit' radio button (not 'Wildcard') in the 'Bundle ID' section on the right-hand side.
In the 'Bundle ID' field, enter the 'Unique App ID' (exactly as it appears on the App's Dashboard in your App Wizard account). See the images below for clarification.
(Unique App ID from the App's Dashboard - click the three vertical dots to reveal)
After entering the required information (App Name and Bundle ID, on the 'Register an App ID' page per above), scroll down the page and make sure the check-box next to 'Push Notifications' is ticked (as shown below). Click 'Continue'.
Note: If you do not want Push Notifications enabled in your App, make sure the check-box is unticked before clicking 'Continue'.
In the 'Confirm your App ID' page that opens next, click 'Register' to save the new App ID.
Phew..... that was the hard part! It is important to get the Explicit Bundle ID correct, otherwise the build will fail. You can now create the Push Notification Certificate.
5. Apple Push Notification (APN) Certificate
|
The following steps are only required if you want to enable Push Notifications in your iOS App. If you don't plan to use Push Notifications, and you did not select the Push Notifications check-box on the 'Register and App ID' page (per above), you can skip to Item 6 below (App Store Provisioning Profile).
Go back to your Apple Developer Account and select the 'Identifiers' section from the left hand side.
Select your newly created 'App ID' by clicking the name you chose (listed in the 'Name' column). This will open the App ID particulars.
In the window which opens ('Edit your App ID Configuration'), scroll down to 'Push Notificatons' and click 'Configure' (as shown below).
Next, click the 'Create Certificate' button under the 'Production SSL Certificate' section (as shown below).
In the window which opens next ('Create a New Certificate), please click on 'Choose File' (as shown below), to upload the App Wizard Push Notification 'Certificate Signing Request' (.CSR) file. You can download the correct App Wizard .CSR file to use here.
Note: This step is very important. It is imperative that you use the App Wizard .CSR file for this purpose, as the Push Certificate (.CER file) which is subsequently generated, needs to match our .CSR file, which is cross-checked as part of the build process. Using a different .CSR file will not enable the Push Notification service to work.
After uploading the .CSR file, click 'Continue' (as shown below).
Once the file is generated, click 'Download' on the 'Download Your Certificate' page.
The Apple Push Notification Certificate file you've downloaded will be named 'aps.cer'. If you download subsequent .CER files to your downloads folder (without having relocated the previous .CER download), they will be named 'aps-1.cer' and so on. Make sure you save your certifcate in a known location. You will need to upload it as part of the build request process.
You're nearly finished. Just the App Store Provisioning Profile to go!
6. App Store Provisioning Profile
|
Go back to your Apple Developer Account and click on the 'Profiles' section on the left side. Then click the blue + button to create a new profile (as shown below).
In the window which opens ('Register a New Provisioning Profile'), go down to the 'Distribution' section and select 'App Store'. Click 'Continue' (as shown below).
In the page that opens ('Generate a Provisioning Profile'), select the App ID you previously created then click 'Continue' (as shown below).
Note: If you have more than one App ID created, make sure you select the correct App that you want to generate a new Provisioning Profile for!
In the window which opens, select the previously created iOS Distribution Certificate and click 'Continue' (as shown below).
In the window which opens next ('Review, Name and Generate'), enter a name for your Provisioning Profile. You can use any name. We recommend naming it in a manner that is specific to the App it is being generated for (for example, 'AppName_Prov_Profile').
Next, click 'Generate' as shown below.
After the profile is successfully generated, click 'Download' to download your new Provisioning Profile file (as shown below). It will be named as specified, with a .mobileprovision extension.
Well done! That's it. You've now generated all the required 'code sign files' that you'll need as part of the submission process at App Wizard. To learn how to upload these files into your App, see the tutorial How to upload Code Sign Files into your iOS App.
