Page Settings

The 'Page Settings' allow you to edit a various settings for all App pages in the one location.
From the Application Dashboard select 'Page Settings' as shown in the image above.
A list of sub-menus is available within 'Page Settings' (e.g. Navigation Bar, Ad Banners, Transition etc.) as shown in the image below. A graphic representation of each setting is shown on the left of the page (below the list of sub-menus). The settings and editing options within each sub-menu are described below.
Note: You can also access the same settings for each individual page clicking on the 'cog' icon for the particular page (in the 'Edit Pages' menu). The benefit of using 'Page Settings' to edit these settings (per this tutorial) is that you do no need to access each page individually (via 'Edit Pages') to effect the desired changes. For more information on how to access these settings from 'Edit Pages', go to Dashboard Tutorial 2.2 Edit Pages. |
The 'Navigation Bar' is the area at the top of each page (in your App) where the 'Page Title' appears. You can change the Title for each page, or add a logo or an image to the Navigation Bar (note that the image must be 160x40 pixels). A different logo can be set individually for each page, or the same logo can be set for all pages in your App in the 'Global Application Settings' section at the top of the page (as circled at the top of the image above).
Some pages have the option to make the Page Title invisible - simply un-check the 'Visible' check-box if you wish to hide the Title for that page. |
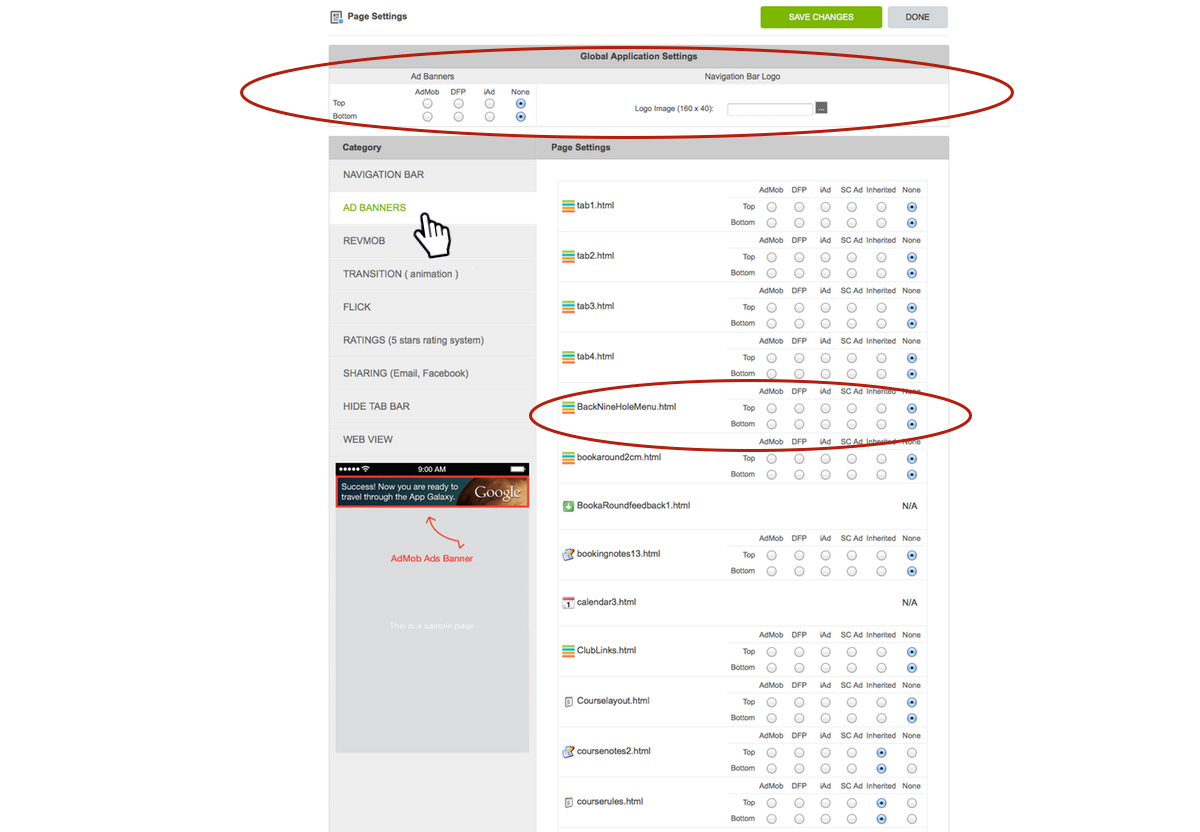
The 'Ad Banners' sub-menu allows you to establish banner advertising in your App, however in order to utilise this feature, you must have your own Apple and Google developer accounts and publish your App under your own account(s), in order to recieve the revenue generated from banner advertising.
Setting up banner advertising is not required for normal builds and is recommended only for advanced users who intend to publish under their own account(s). Developers should note that the 'Ad Banners' settings indicated in the 'Global Application Settings' (e.g. AdMob, DFP, iAd etc.) will only apply to pages that have 'Inherited' selected (on the row for each individual page listed down the right hand side).
Note: If you do not wish to publish your App(s) under your own account(s), but still wish to include advertising in your App to generate a new revenue stream, we recommend selling 'Advertising Space' in appropriate locations in your App so that you can collect advertising revenue directly from sponsors / advertisers. |
'RevMob' is another in-App advertising option that will display (pop-up or full screen) advertisements on selected pages in your App. This type of advertising is the same as 'Banner Advertising' (described above) which requires you to have your own Apple and Google developer accounts in order to recieve the revenue generated from these advertisements.
Setting up RevMob advertising is not required for normal builds and is recommended only for advanced users who intend to publish under their own account(s).
Note: As with 'Ad Banners', if you do not wish to publish under your own accounts, but wish to include advertising in your App to generate a new revenue stream, we recommend selling 'Advertising Space' in appropriate locations in your App. This arrangement allows you to retain control of the advertising rates and also allows you to collect revenue directly from advertisers / sponsors (potentially in advance), without the need to publish under your own account. |
The 'Transition' settings allows you to edit how each page 'transitions' from one page to the next (e.g. fade). This setting will apply when you navigate to the page (in the App) that has the setting applied (e.g. the page will 'fade in'). You can edit the Transition setting for each page individually via this sub-menu.
Note: When editing Transition settings, we recommend clicking 'SAVE CHANGES' after each page is edited, before editing the Transition settings for subsequent pages. |
'Flick' settings also allow you to edit how each page transitions from one page to the next. These settings apply to page types that can be swiped.
Flick options include the ability to slide, curl or flip pages. You can also include an audio file (sound) for the page being navigated to. You can edit the Flick setting for each page individually via this sub-menu.
Note: When editing Flick settings, we recommend clicking 'SAVE CHANGES' after each page is edited, before editing subsequent pages. |
Ratings (5 Star Rating System)
|
This setting allows users (players) to 'Rate' each page (using a 5-Star rating system). This setting is optional and is not included in most App Wizard templates. To enable a page to be 'rated', simply tick the corresponding check-box for that page. As with all 'Page Settings' we recommend clicking 'SAVE CHANGES' after editing the setting for each page.
|
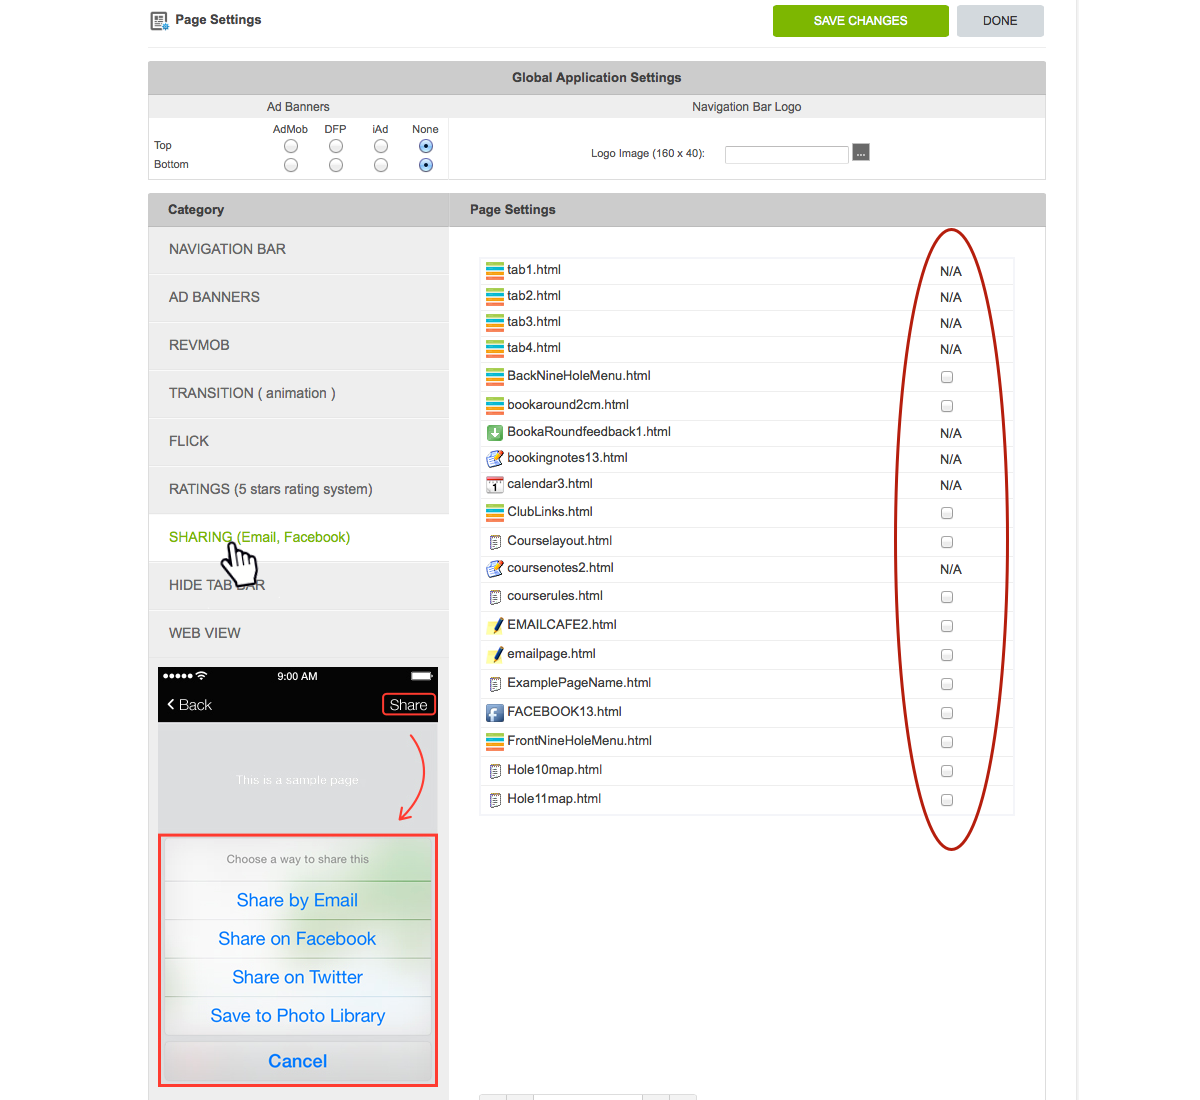
Sharing (Email, Facebook)
|
This setting activates a 'Share' button at the top of each page which allows the user to Share the page with other people via email, Facebook, Twitter, or save the page to the device's Photo Library (to share later). For example, a user may want to Share a page in your app. This option can facilitate increased exposure of your App (or particular pages in your App). Simply tick the check box of the corresponding page that you wish users to be able to share.
Note: When editing Share settings, we recommend clicking 'SAVE CHANGES' after each page is edited, before editing subsequent pages. |
This setting will remove (hide) the bottom tab bar on checked pages. The 'Back' button will be retained as the only page navigation option available (unless a custom navigation button has been built specifically into the page). This setting is not optional for all page types.
|
The 'Web View' setting allows users to zoom-in and zoom-out (i.e. pinch zoom on the handset display) on selected pages. This setting can be particularly helpful when a page contains a lot of detail.
To enable zoom functionality, just tick the 'Zoom enabled' check box for the corresponding page.
Web View settings also allow for the inclusion of 'Dynamic data' on each page. This setting is not typcially required when building your App from an existing App Wizard template. Editing this setting requires familiarity with JSON configurations (i.e. provided for advanced users only).
Note: When editing Web View settings, we recommend clicking 'SAVE CHANGES' after each page is edited, before editing subsequent pages. |
|